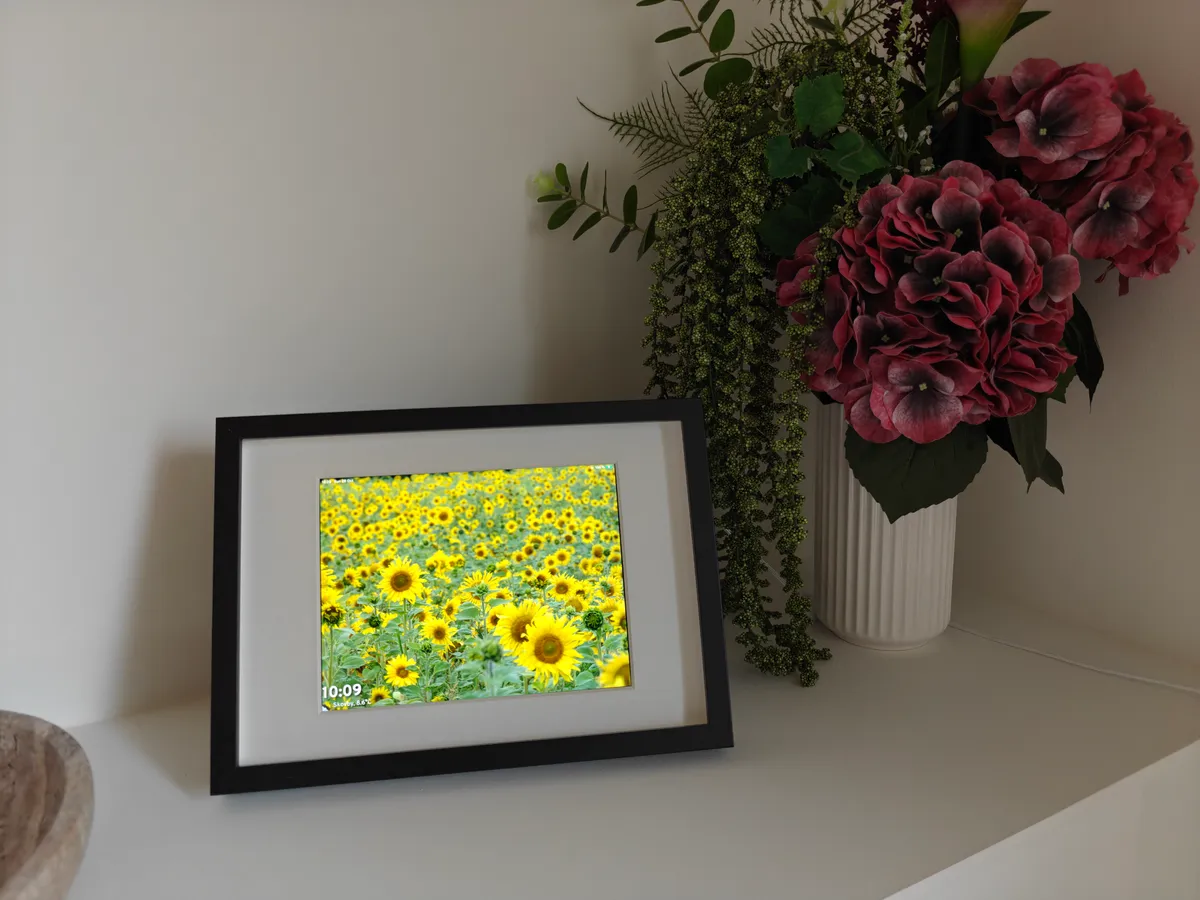
I’ve been wanting a proper photo display frame for a while now. You know the type; something that cycles through your favorite memories, sits elegantly on a shelf or hangs on the wall, and just works.
What I Desired
The needs were straightforward really:
- High-quality image display: I didn’t want some cheap, low-resolution screen that makes my photos look worse than they deserve
- Offline, non-cloud based: I wanted my photos to stay my photos, not floating around on someone else’s servers. Nor did I want the device to just die because the internet went down
- No subscription nonsense: I’m tired of everything becoming a monthly fee. Buy it once, own it forever
Turns out, finding something that ticks all these boxes without breaking the bank is harder than you’d think. So naturally, I decided to build my own.
The iPad: Giving Tech a Second Life
Rather than buying new, I went with a refurbished iPad from refurbed.dk. I went for an iPad Air 2 (2014) with a 9.7” display, 16 GB storage, in space grey, and it came with a 12-month warranty. The total cost? 734.99 DKK. Actually quite pricey, but I believe it was worth it for:
- Retina display
- 2048-by-1536-pixel resolution at 264 PPI
- Antireflective coating
I think if this were a device I would be using as a portable device, then I might question the battery life. I also didn’t care for any scratches on the back or sides, as they’d be covered by a frame anyway. Another thing I really liked about this choice, the environmental impact. According to the order details, by choosing refurbished, I contributed to:
- 435 g e-waste saved
- 82 kg CO2 saved
- 37,398 liters of water saved
Not bad for a photo frame, right? Plus, there’s something satisfying about keeping perfectly good tech out of a landfill.
The Frame: IKEA to the Rescue
For the actual frame, I kept it simple with IKEA’s RÖDALM in black, sized 21x30 cm. Cost only 39 DKK. Honestly, any frame larger than the iPad would work, just pick whatever style matches your space. The key is getting the passe-partout sized correctly to fit your specific setup.
The Passe-Partout: Custom is King
This is where things got a bit more involved. I needed a custom passe-partout to properly mount the iPad within the frame, and I didn’t want to play the guessing game with off the shelf options.
I ordered from specialrammer.dk with these specifications:
- White passe-partout, custom sized
- Centered opening
- Outer dimensions: 21 cm x 30 cm (to match the IKEA frame)
- Opening dimensions: 14.8 cm x 19.7 cm (a little smaller than the iPad screen dimensions)
- Total cost: 112.90 DKK (though 69 DKK of that was postage… ouch!)
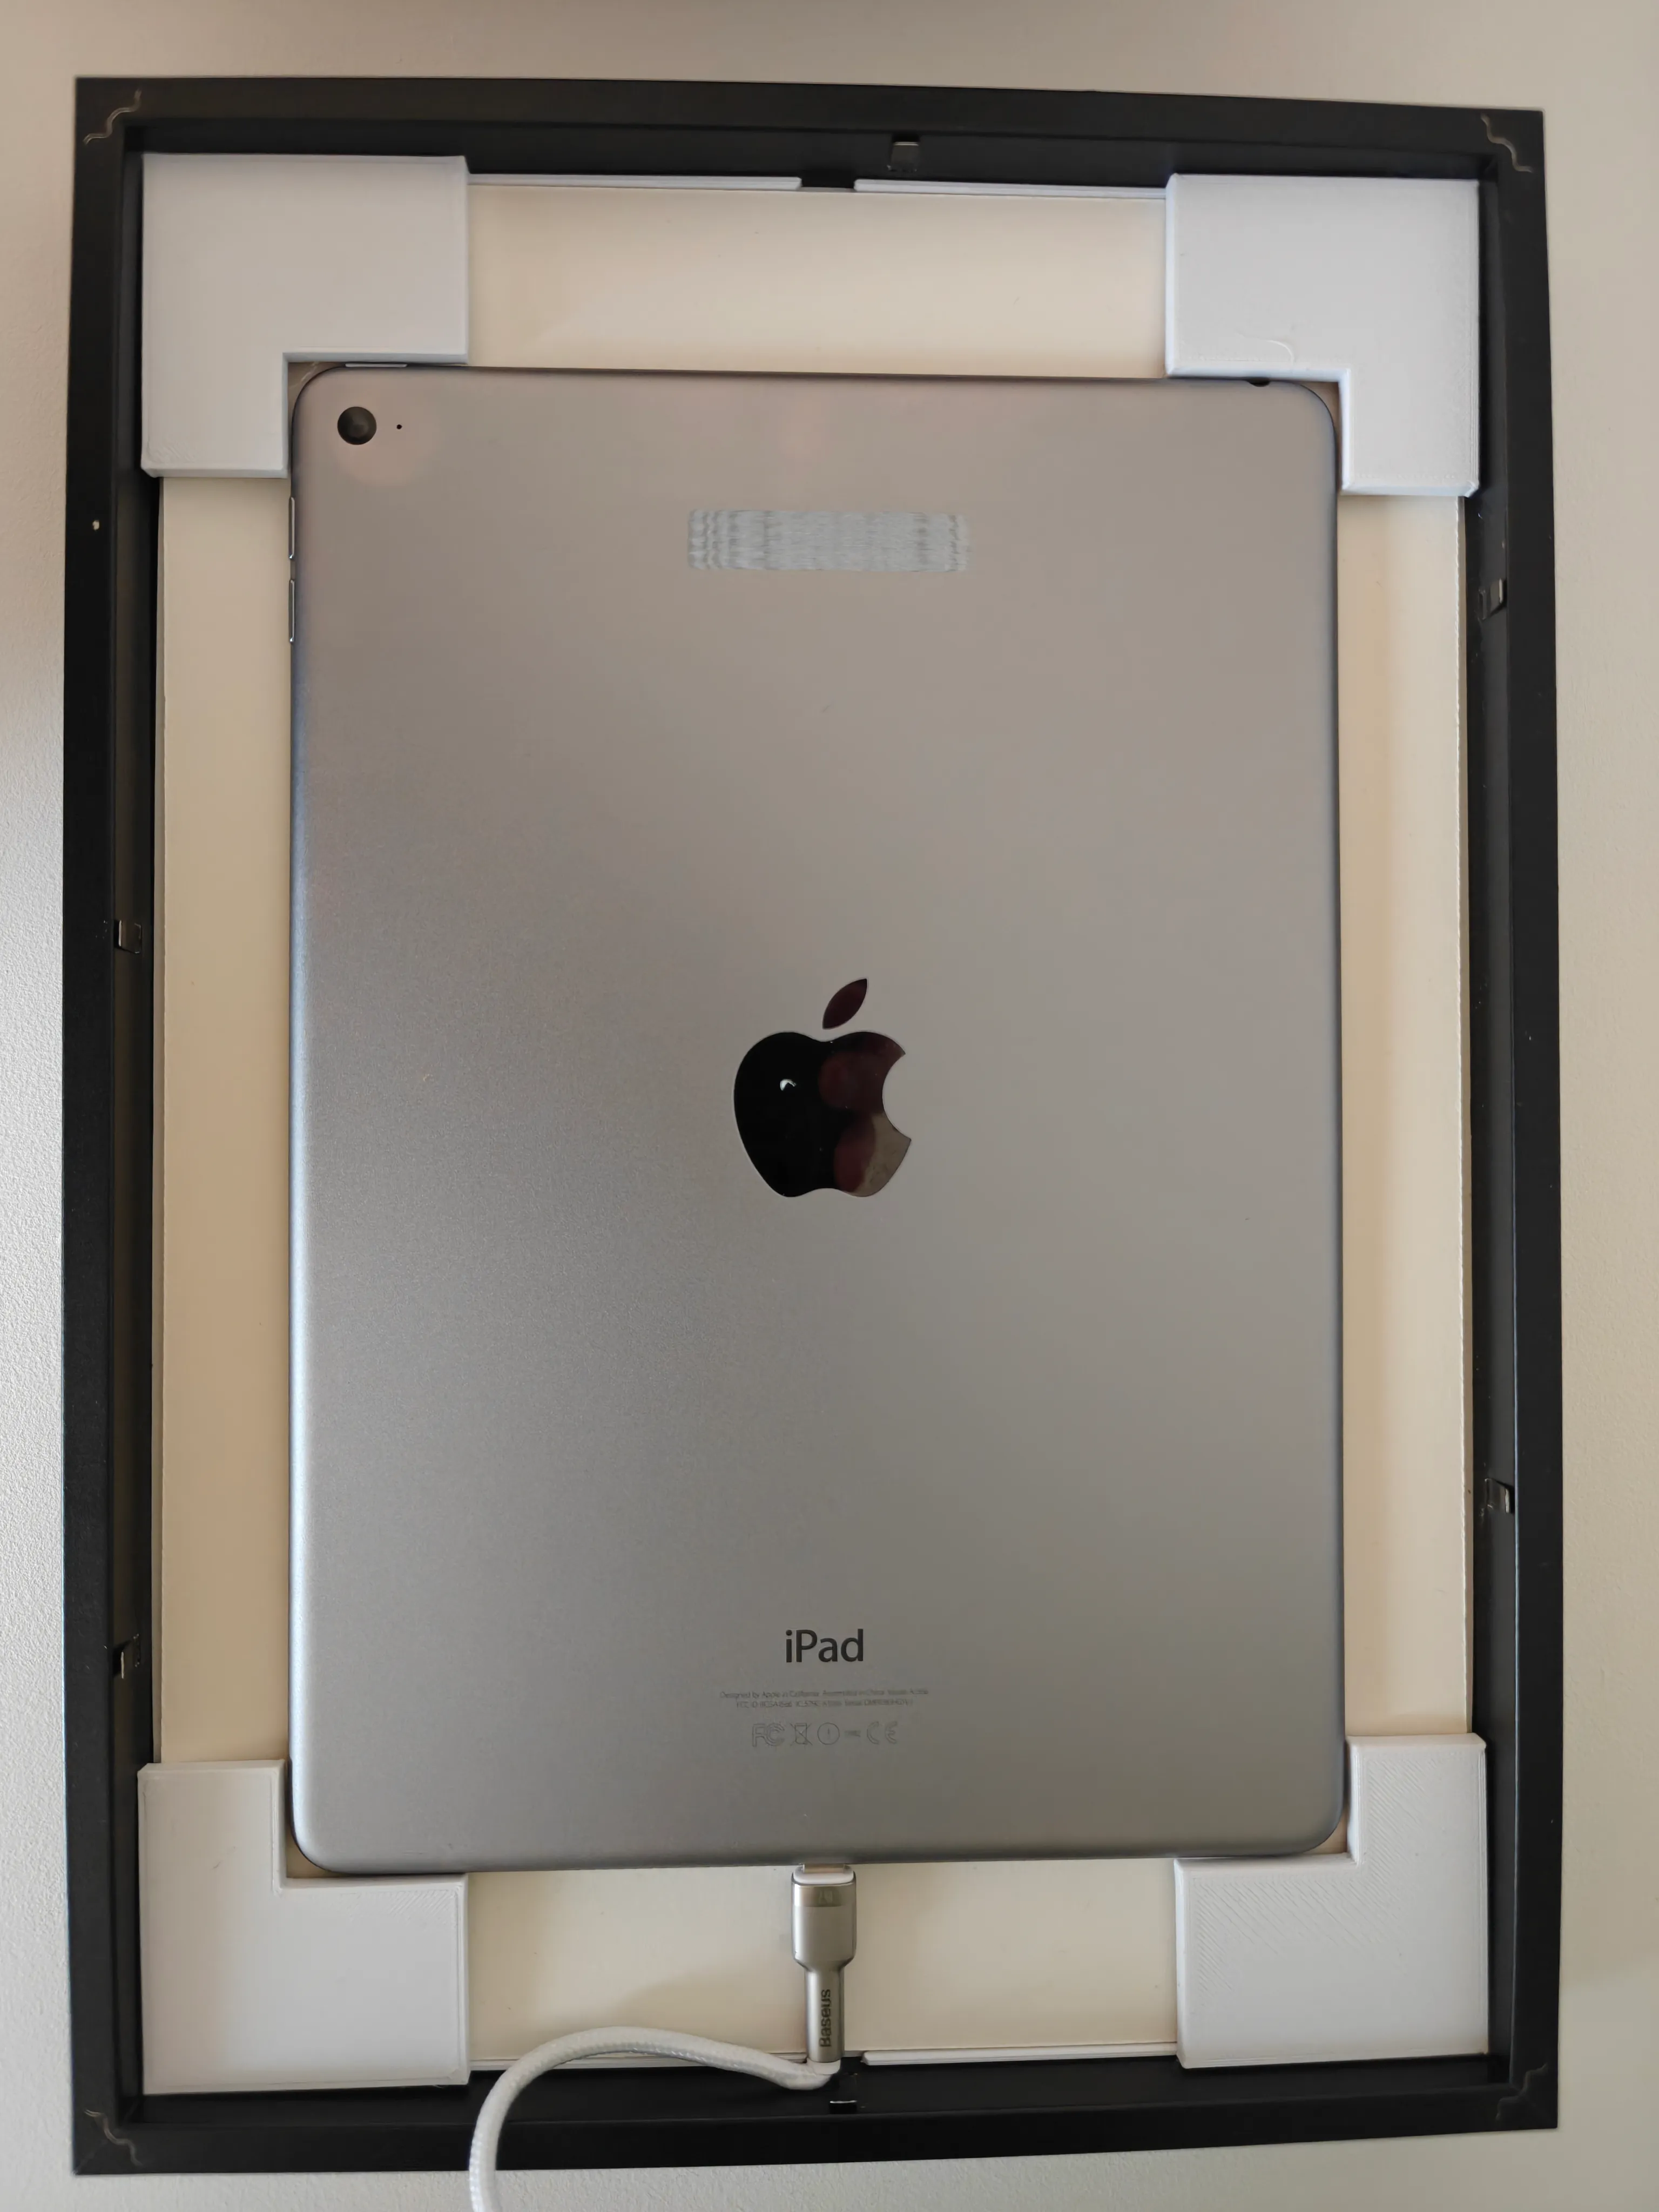
The 3D Printed Holder: Keeping Things Stable

The iPad doesn’t naturally sit flush in the frame, so I designed some corner brackets to hold it in place. The dimensions were:
- Left: 500 mm
- Top: 500 mm
- Bottom: 310 mm
- Right: 210 mm
- Thickness: 7 mm (to match the iPad’s height)
I printed four brackets (one for each corner), though in hindsight, two would probably suffice in opposite corners. If you don’t have a 3D printer, then I think that you could easily make these from wood or even thick cardboard. Would probably be quicker than waiting for the prints to finish too.
Here’s how they look in the frame:
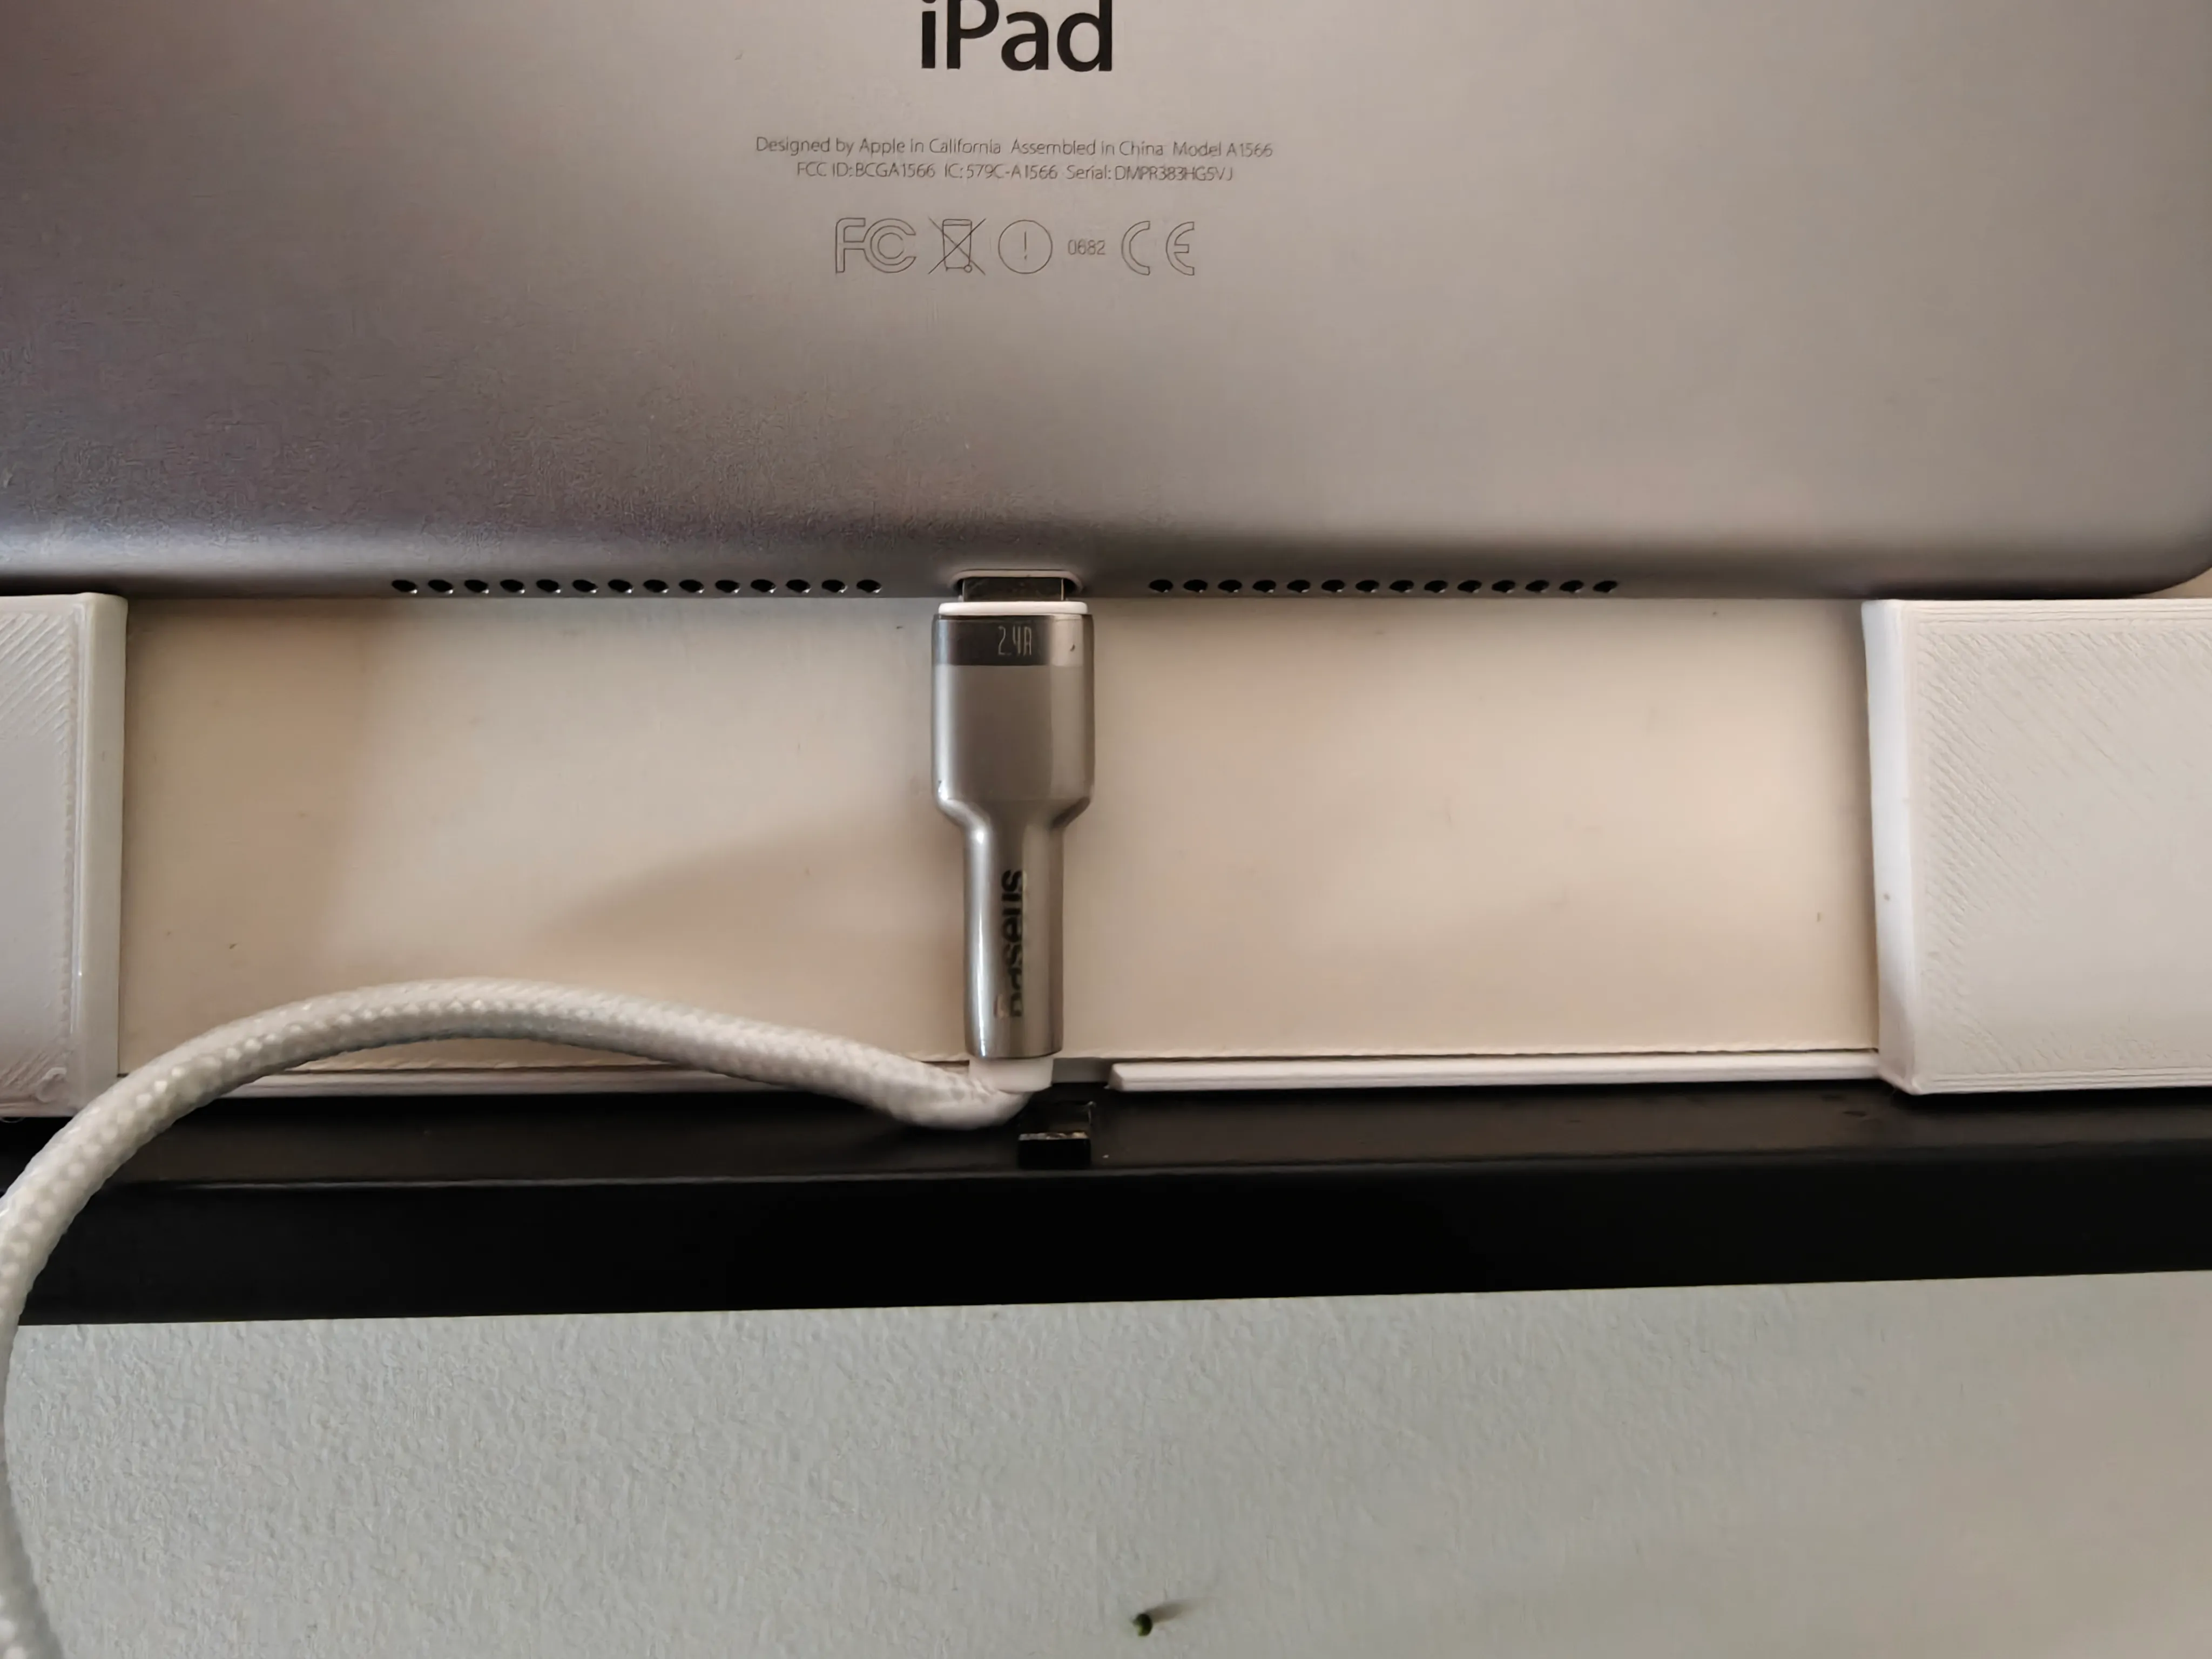
Power: The Cable Conundrum…
The iPad didn’t come with a cable, and here’s where things got a little challenging. The iPad’s Lightning port faces the frame, so I needed a cable that could fit in, but then bend out in a very short space.
My first attempt was a Temu order that included a 90 degree/angled iPhone charging cable (24.26 DKK) and a resin picture frame set (81.36 DKK). The resin frame arrived broken at three of four corners, and while the cable worked initially, it didn’t deliver enough power to keep the iPad screen on consistently.
I ended up ordering a proper cable from ledpaerer.dk: the “USB-kabel til Lightning Baseus Cafule, 2.4A, 2m” in white for 24 DKK. This one actually works, and seems to be delivering power no problem.
Luckily, it just fits…
For the USB charger plug, I had some Essager 20W GaN PD USB C Chargers from a previous AliExpress order lying around, which worked perfectly. They only cost around 30 DKK.
The Software: Immich and Immich Frame
I host an instance of Immich on my server. It’s a self hosted photo and video management solution that lets you “easily back up, organize, and manage your photos on your own server” without sacrificing privacy.
Some time ago, I was without warning essentially “banned” from Amazon. As in, I could not log in at all. Not even to be able to use the customer support. I had to find some obscure phone number from another website which allowed me to call in, where then they just re-enabled by account. What the hell?? I have, and still do, use Amazon Photos as a way of keeping backups of photos. Since I have Amazon Prime, it makes sense to make use of this backup too.
Anyway, If you’re running Proxmox, there’s even an LXC script to get started quickly. I actually set mine up before this script existed, so I’m running it via Docker Compose, but either way works great.
For the display itself, I’m using Immich Frame. It’s a fantastic project designed specifically for this use case. There was just one problem: there weren’t really any good free “kiosk-like” options for running on iPad, and Immich Frame needed to be shown in a browser.
I opened an issue asking about potential PWA (Progressive Web App) support, and the maintainer not only agreed but implemented it rather quickly. This is open source at its best.
Then quite simply, I manage an album in Immich called “Display Frames” where I select which photos I find most appealing to be shown on any display frame. Then Immich Frame can rotate through images from this album. This album I also use on other devices running a Home Assistant Dashboard for instance as well.
The Docker Compose file is as follows (based on the source docker-compose file):
#
# WARNING: Make sure to use the docker-compose.yml of the current release:
#
# https://github.com/immich-app/immich/releases/latest/download/docker-compose.yml
#
# The compose file on main may not be compatible with the latest release.
#

# NOTE: Make sure to also create an associated .env file for variables

name: immich

services:
  # Keep things automatically updating (optional)
  watchtower:
    image: containrrr/watchtower
    environment:
      - WATCHTOWER_CLEANUP=true
    volumes:
      - /var/run/docker.sock:/var/run/docker.sock
  # The Immich Server
  immich-server:
    container_name: immich_server
    image: ghcr.io/immich-app/immich-server:${IMMICH_VERSION:-release}
    volumes:
      - ${UPLOAD_LOCATION}:/usr/src/app/upload
    env_file:
      - .env
    ports:
      - '2283:2283'
    depends_on:
      - redis
      - database
    restart: always
    healthcheck:
      disable: false
  # Immich Frame for display on devices (the iPad for example)
  immichframe:
    container_name: immichframe
    image: ghcr.io/immichframe/immichframe:latest
    restart: always
    depends_on:
      - immich-server
    ports:
      - "8080:8080"
    volumes:
      - ${IMMICHFRAME_CONFIG_LOCATION}:/app/Config/Settings.json
    environment:
      TZ: "Europe/Copenhagen"

  immich-machine-learning:
    container_name: immich_machine_learning
    image: ghcr.io/immich-app/immich-machine-learning:${IMMICH_VERSION:-release}
    volumes:
      - model-cache:/cache
    env_file:
      - .env
    restart: always
    healthcheck:
      disable: false

  redis:
    container_name: immich_redis
    image: docker.io/redis:6.2-alpine@sha256:eaba718fecd1196d88533de7ba49bf903ad33664a92debb24660a922ecd9cac8
    healthcheck:
      test: redis-cli ping || exit 1
    restart: always

  database:
    container_name: immich_postgres
    image: ghcr.io/immich-app/postgres:14-vectorchord0.3.0-pgvectors0.2.0
    environment:
      POSTGRES_PASSWORD: ${DB_PASSWORD}
      POSTGRES_USER: ${DB_USERNAME}
      POSTGRES_DB: ${DB_DATABASE_NAME}
      POSTGRES_INITDB_ARGS: '--data-checksums'
    volumes:
      - ${DB_DATA_LOCATION}:/var/lib/postgresql/data
    restart: always

volumes:
  model-cache:
The Apple Tax Rant
Here’s something that frustrates me. Immich Frame is a great project, which would happily make a native iOS app, but Apple requires developers to pay $100 every single year just for the privilege? This forces app creators to charge for apps to recoup costs, and ultimately benefits Apple more than anyone else. The ecosystem has its perks, but this particular aspect? It sucks.
Kiosk Mode: Locking It Down
iOS has a feature called Guided Access that lets you lock down the device to a single app. For my home use case, it works perfectly to prevent anyone from accidentally (or intentionally) switching to other apps. It’s not enterprise grade security, but it’s more than enough for a photo frame.
The Result
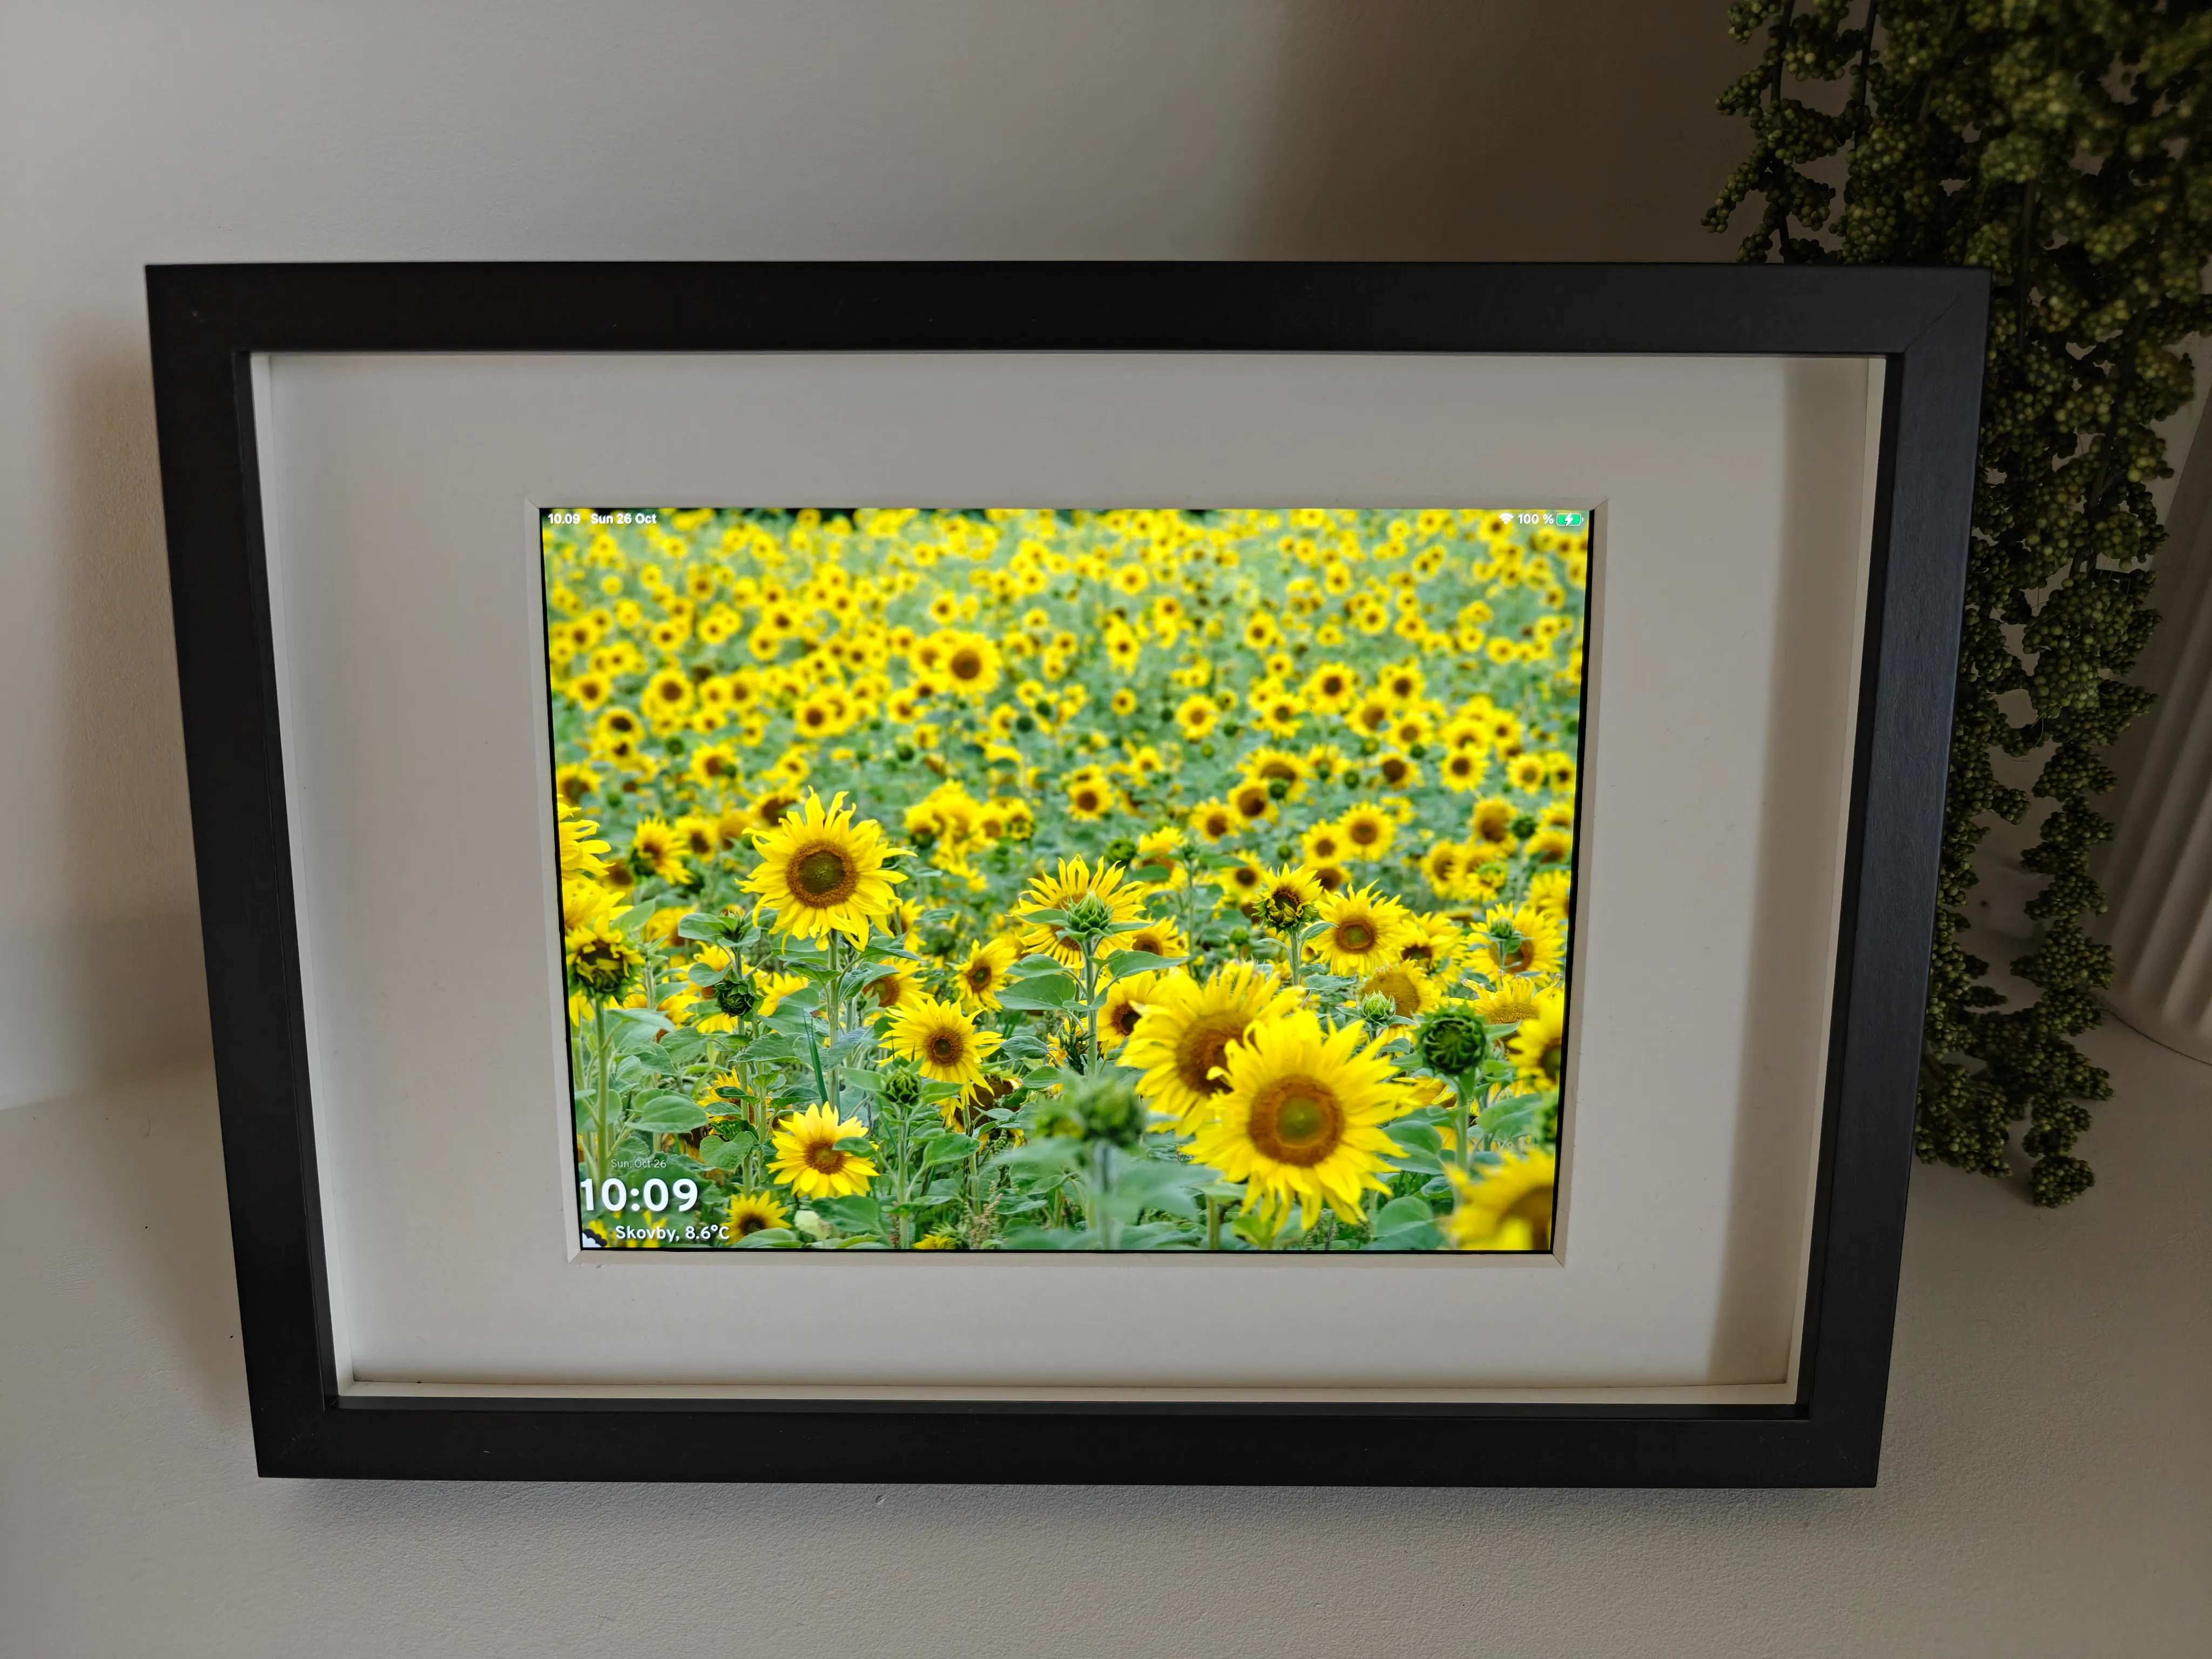
So there you have it a high quality, offline, subscription free photo display frame for under 900 DKK (not counting the charger I already had). It displays my photos beautifully, respects my privacy, and gave a second life to a perfectly good iPad.
Here’s the BOM (Bill of Materials):
| Item | Source | Price (DKK) | Notes |
|---|---|---|---|
| Refurbished iPad Air 2 (2014) | refurbed.dk | 734.99 | 9.7” display, 16 GB, space grey, 12-month warranty |
| RÖDALM Frame (21x30 cm, black) | IKEA | 39.00 | Any frame larger than iPad works |
| Custom White Passe-Partout | specialrammer.dk | 43.90 | Might be able to find a standard size one for less |
| USB-kabel til Lightning Baseus Cafule, 2.4A, 2m | ledpaerer.dk | 24.00 | White, proper power delivery |
| Essager 20W GaN PD USB C Charger | AliExpress | ~30.00 | From previous order |
| 3D Printed Corner Brackets | Self-printed | ~0.00 | Filament cost negligible; could use wood/cardboard |
| Total | ~871.89 DKK | Around 116.72 EUR |
The best part? It’s entirely under my control. No cloud services, no monthly fees, no wondering if the company will shut down their servers next year. Just my photos, my hardware, and my home network. Though also, my problem if anything goes wrong of course 😁
Would I recommend this approach? Absolutely, if you’re comfortable with a bit of DIY and want something that’s truly yours. The refurbished iPad route is particularly satisfying, both for the wallet and the environment. And with Immich and Immich Frame handling the software side, the whole setup just works.
Further Improvements
In the future, I’d still like an app that means the top status bar is not shown. I recall something that this status bar is actually difficult (impossible?) to hide. I don’t care to see the time and date or battery status on a full screen app.
The PWA works well, though I have to zoom in a little to get a more “full screen” like experience. It would be great if this wasn’t needed too.